This project is not an assignment for 2021. It is only provided as a reference for people that want to get started with AWS.
Building a Web Server on EC2
Due date: N/A
The goal of this exercise is to familiarize one with:
- Launching, managing, running EC2 instances
- Basic system administration of Linux machines
The following instructions will help you, but they are not comprehensive. You should expect to use some intuition, web searching, and trial and error to get everything working.
Create an Amazon Web Services (AWS) account
If you already have an AWS account you can skip this step. You will need a credit card to complete this process.
- Go to http://aws.amazon.com/ and click the Sign Up button on the top of the page.
- Follow the steps until you are done.
Sign in to EC2
- Go to http://aws.amazon.com/console/ and click “Or Sign In to the Console” in the box on the right. Complete sign in.
- You should be in the N. Virginia region https://console.aws.amazon.com/console/home?region=us-east-1.
- In the upper right hand corner, make sure that your availability zone (between
your nameand Support) is “N. Virginia” - Under Build a solution go to EC2 by clicking on Launch a virtual machine.
Creating VPC
- Go to https://console.aws.amazon.com/vpc/.
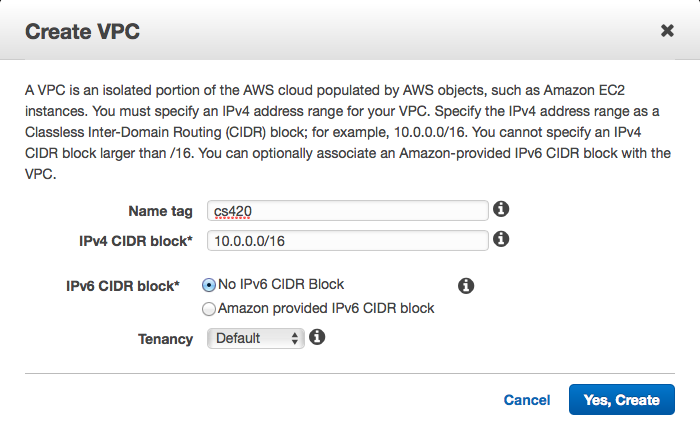
- Click “Your VPCs” on the left, then “Create VPC” and fill in the fields as below:
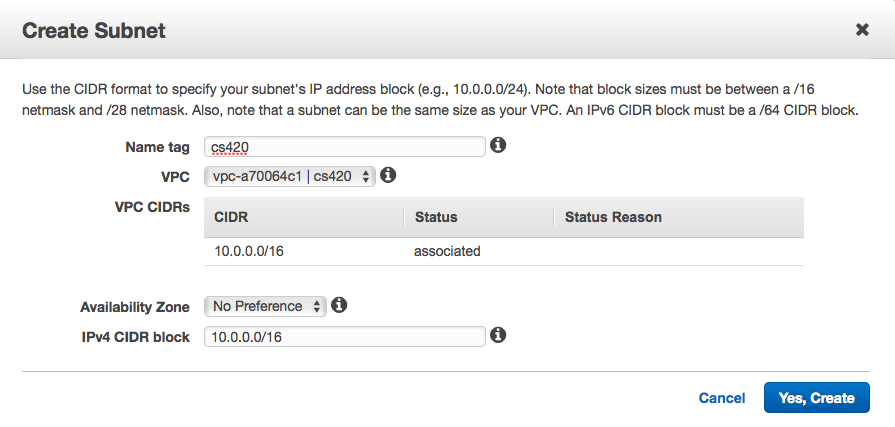
- Click “Subnets” on the left, then “Create Subnet” and fill in the fields as below:
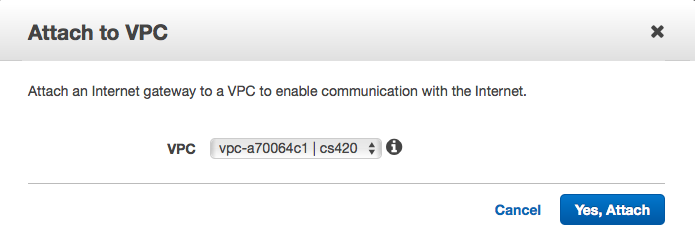
- Click “Internet Gateways” on the left, then “Create Internet Gateway”, then “Attach to VPC” with your VPC name.
- Then make sure to attach the gateway to the VPC:
- Click “Route Tables” on the left, then highlight the cs420 row, scroll to the bottom, click the “Routes” tab.
- Click “Edit”, then “Add Another Rule”, then, under the Target tab, select Internet Gateway, and select the igw you set up in the previous step. Set 0.0.0.0/0 for the destination and “Save” so that it looks like this:

Creating Security Group and Key Pair
- Go to https://console.aws.amazon.com/ec2.
- Click “Security Groups” on the left under Network and Security, then “Create Security Group”, then edit the Inbound rules to have the following rows:
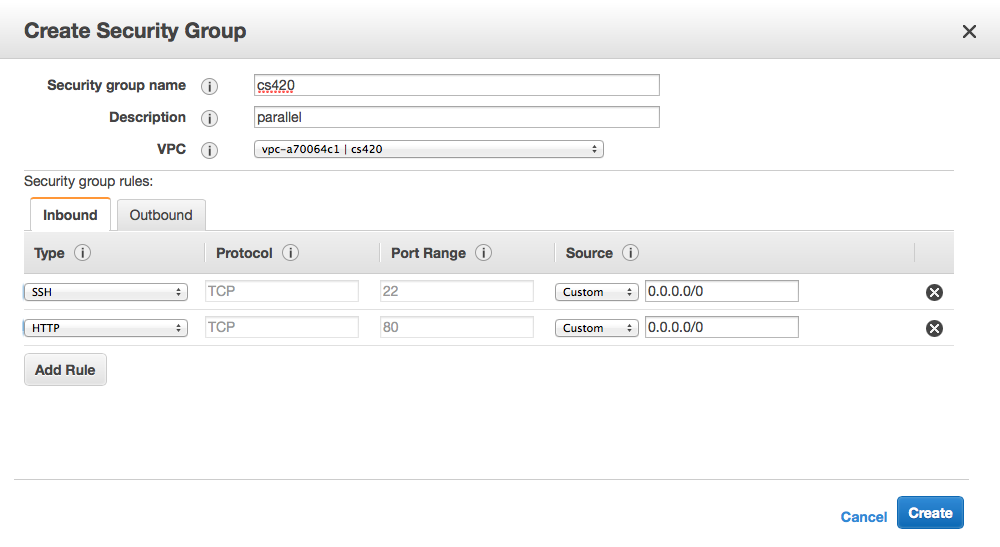
- Click “Key Pairs” on the left under Network and Security, then “Create Key Pair”. Choose a name (anything you will remember). This will download a “.pem” file with login credentials. You need to keep this file. Put is somewhere that you can find it.
- change the permissions of the file: e.g.,
chmod 0600 cs420.pemon your local machine
Launch a micro instance
- Select “Instances”, then “Launch Instance”. Check the box on the left menu bar next to “Free tier only”.
- Select Ubuntu Server 16.04 LTS (HVM), SSD Volume Type. On the next page, select the t2.micro instance (the only one that’s on the “free tier”).
- Next: “Configure Instance Details”.
- Change “Auto-assign Public IP” to Enable:

- Change “Auto-assign Public IP” to Enable:
- Next: “Add Storage”. These settings are fine.
- Next: “Add Tags”
- fill in a value field for the name. This is how your instance will appear in the console.
- Next: “Configure Security Group”.
- Choose “Select an existing security group” and choose the cs420 group you created earlier:
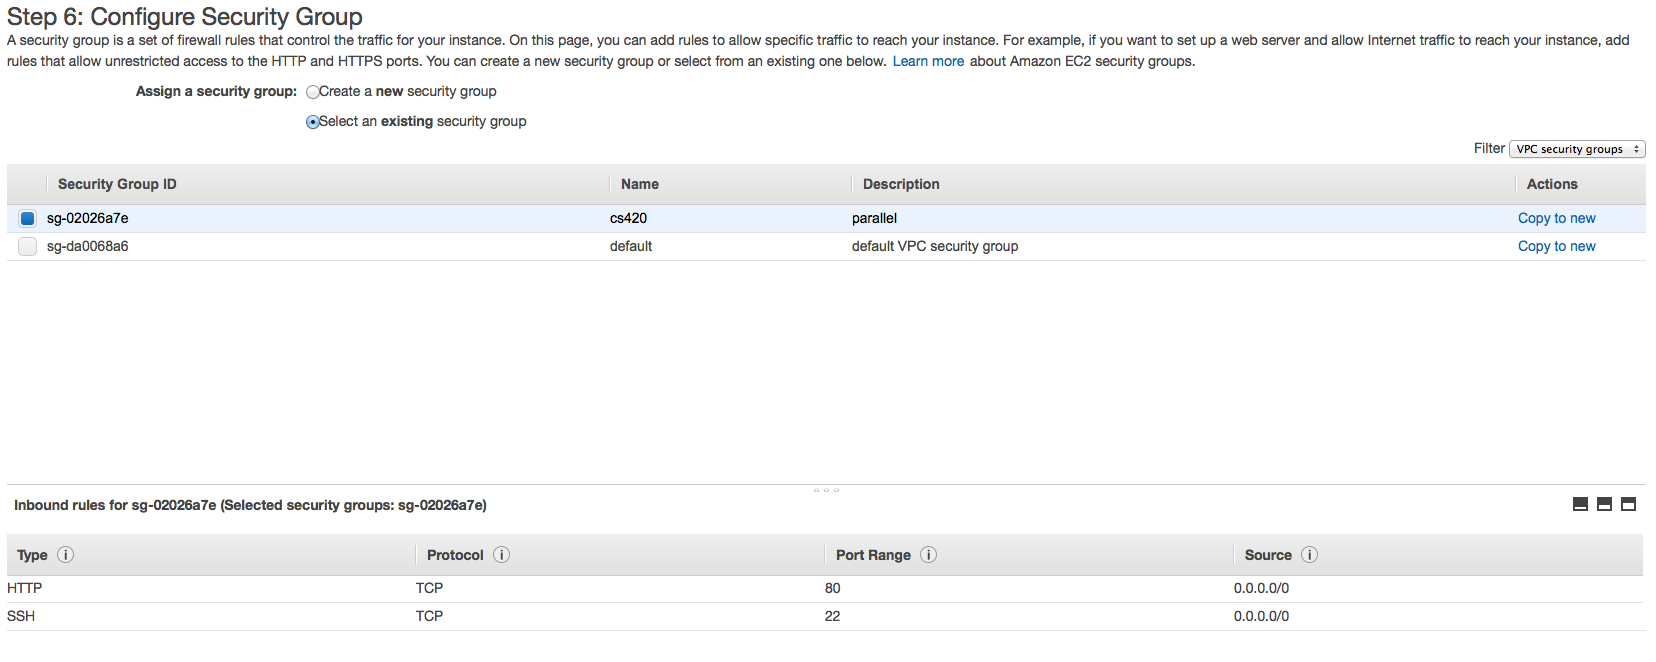
- You should see a warning about your security group being open to the world. This is fine for now.
- Choose “Select an existing security group” and choose the cs420 group you created earlier:
- Finally, select “Review and Launch”.
- Click Launch instance. You will be prompted for a keypair. Use an existing pair. The one you created earlier.
Log into the instance
- Go to the ec2 dashboard and select running instances
- Highlight the instance (radio button)
- Get the public DNS name (or IP address)
- Login to the instance using ssh:
- different instances require different user names, ubuntu instances require ubuntu.
- e.g., if you instance is ec2-54-84-25-90.compute-1.amazonaws.com and your keypair cs420.pem you would use
ssh -i cs420.pem ubuntu@ec2-54-84-25-90.compute-1.amazonaws.com - Your .pem file must be visible to ssh. Give a full path or have it in the local directory.
Install a Web server
Everyone should know how to build a web server. Install apache, php, and enable the php module for apache.
sudo apt-get install apache2 php7.0 libapache2-mod-php7.0
sudo a2enmod php7.0
sudo /etc/init.d/apache2 start
sudo may give you a warning that it cannot resolve the host name. This may be safely ignored.
Create a file /var/www/html/index.php that contains the following information. You will need to sudo this command, e.g. sudo nano /var/www/html/index.php
<?php phpinfo() ?>
Read the file through a Web browser. Again, get the DNS name.
e.g. http://ec2-54-84-25-90.compute-1.amazonaws.com/index.php
Work product
This assignment has two parts. The first is a file generated by the EC2 instance Web server. The second is a PDF writeup.
- Project 0.1 Code: The source of the webpage returned from the index.php page as a file named
index.php(index.htmlorindex.htmis fine, too). It should look something like:
<!DOCTYPE html PUBLIC "-//W3C//DTD XHTML 1.0 Transitional//EN" "DTD/xhtml1-transitional.dtd">
<!-- saved from url=(0057)http://<<YOUR INSTANCE DNS NAME HERE>>.compute-1.amazonaws.com/index.php -->
<html xmlns="http://www.w3.org/1999/xhtml"><head><meta http-equiv="Content-Type" content="text/html; charset=UTF-8">
<style type="text/css">
   ...
   (about 20 lines here)
   ...
</style>
<title>phpinfo()</title><meta name="ROBOTS" content="NOINDEX,NOFOLLOW,NOARCHIVE"></head>
   ...
Project 0.1 Questions: You should perform the following actions on your instance and be familiar with the command needed to discover the information. (e.g. 0. How long has the system been powered on? Answer: 5 mins. Command: uptime.) There may be multiple answers to each question.
- How large is the system’s root drive, mounted on “/”?
- How much memory does the system have?
- How much memory is being used?
- What linux kernel version are you running?
- What is the MAC address of the Ethernet card?
- What is the last message in the log file where system messages/errors would be found? Where is this file located?
What to turn in?
Please submit a file in either .pdf format, markdown .md, or in plain text .txt that contains the answers to the questions and the requested ouptut. For the web page, cut and paste the html contents. For the questions, answer the question and show what command that you used to determine that answer.
Turn this file in on Gradescope.